Caring for a loved one who has limited mobility is a big act of love, but it can take a toll on shoulders, backs, and peace of mind. ACG Medical Supply stocks an entire lineup of patient transfer lifts that lower the physical strain on caregivers while keeping transfers secure and dignified for the person in the sling. This guide breaks down what today’s lifts can do, types of lifts available, and—most importantly—how to use a patient lift the safe, confidence-building way.
Why a Patient Lift Belongs in Every Home-Care Toolbox
Lifting an adult isn’t just heavy; it’s downright awkward. Twisting while supporting weight places up to 1,200lbs of force on a caregiver’s spine.
Here’s why every home-care setup benefits from a lift:
- Saves your back (and shoulders). Lifts take the heavy strain off, so you’re not twisting or overexerting yourself every time you help someone move.
- Ensures patients are transferred from one to another comfortably without feeling pulled or dragged.
- Creates safer environments by lowering the chance of falls or skin tears.
- Saves time and energy, leaving more room for quality interactions instead of stressful lifting.
And it’s not just about muscles and joints. Safe transfers mean fewer skin tears, less chance of falls, and none of that unsettling “being manhandled” feeling. In short, a lift protects bodies and relationships.
Types of Patient Transfer Lifts
Different households and care needs call for different styles of lifts. Here’s a breakdown of common types:
| Lift Style | Best For | Key Benefits |
| Manual Hydraulic Lift | Budget-conscious homes or occasional transfers | No batteries required, simple to use, reliable |
| Electric Sit-To-Stand Patient Lift Chair | Users who can bear some weight and follow cues | Encourages leg strength, supports quick bathroom trips |
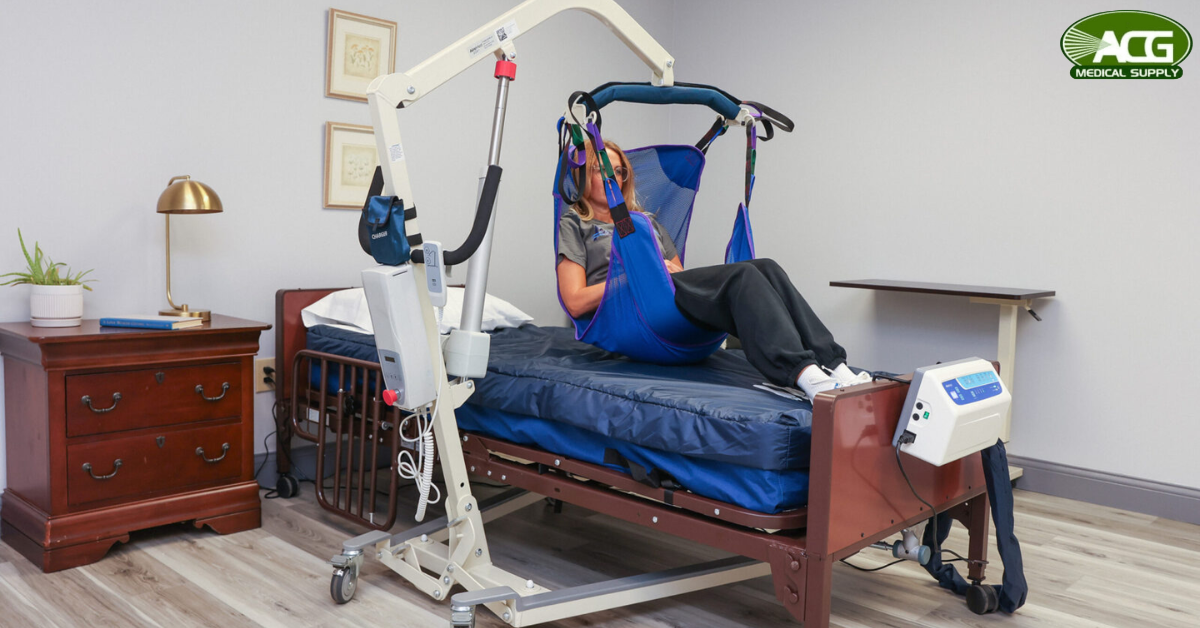
| Full-Body Electric (Hoyer-style) | Individuals with no weight-bearing ability | Quiet motor, smooth and steady lifting |
| Bariatric Models | Patients over 400 lbs | Reinforced frames, wider booms for added stability |
Each type of lift has its place. Some families go with a manual patient lift because it’s budget-friendly and dependable. Others lean toward using a Hoyer Lift at home when patient transfers are more frequent and comfort is the utmost priority.
How to Use a Patient Lift: Step-by-Step Guide
Using a lift isn’t that difficult, but like most new things, using the lift feels easier after a little practice. The trick is to take it slow and follow the same pattern each time. Here’s a step-by-step patient lift guide:
1. Prep the Lift and Sling
Before anything else, give the lift a once-over. Are the wheels rolling smoothly? Brakes locking in place? If it’s electric, check that the battery isn’t on its last leg because you don’t want it dying halfway through. Lay the sling out flat and untangled; a twisted sling is a headache you don’t want mid-transfer.
2. Position the Sling
This part feels tricky at first, but gets easier. Gently roll your loved one onto their side, slide the sling under them, then roll them back. Smooth it out under the shoulders and thighs so there’s no bunching or pinching; comfort matters more than speed here.
3. Attach and Begin the Lift
Clip the sling straps into the hooks, then pause and double-check every single one. Nothing’s worse than realizing a strap isn’t secure once you’re mid-air. When you start lifting, go really slow. If the person looks anxious, take a minute and reassure them.
4. Move with Care
Don’t unlock the brakes until you are actually ready to move, and when you do, take it easy around rugs, furniture, or whatever clutter’s in the way. Always keep an eye on how the person in the lift is feeling, and talk to them through it. Saying simple things like “We’re moving now” or “almost there” can make them feel safer and more involved.
5. Lower and Settle
Lock those brakes again before lowering the patient. Guide them gently into the chair, bed, or wherever they’re headed. Only unclip the sling once they’re sitting safely and securely.
Patient Lift Safety Tips for Every Caregiver
A patient lift certainly makes things a lot easier, but safety still comes first. A few golden rules:
- Read the manual. Is it boring? Yes. But is it necessary? Also yes.
- Take your time. This isn’t a race. Rushing usually ends in mistakes.
- Double-check every strap and clip before lifting.
- Clear the floor. Even a stray sock can turn into a hazard.
- Keep talking. Let the patient know what’s happening so there are no surprises.
- Stick to the weight limits. No exceptions.
- Practice first. Run through it with a friend, a pillow, or even just on your own before trying it with the patient.
Conclusion
Patient transfer lifts really are lifesavers, for both the person doing the lifting and the one being lifted. They take away so much of the stress and strain that usually comes with patient transfers. Instead of worrying about your back giving out or whether you’ll lose balance and fall, you can actually relax. And honestly, once you’ve practiced a few times, using a lift feels easier than ever. It just becomes part of the routine, like second nature.
FAQs:
Q1: Manual vs. electric—what’s the difference?
Manual lifts use a pump handle and they are more affordable. Electric lifts run on a motor, less effort, smoother motion.
Q2: Sit-to-Stand or full-body?
If the person can bear some weight, go Sit-to-Stand. If not, a full-body (Hoyer) is safer.
Q3: How do I transfer safely at home?
Take it slow, check straps and brakes, and walk them through each step.
Q4: Do lifts need maintenance?
Yes, you should check brakes, wheels, and slings regularly. If you using an electric one, then recharge or replace batteries when needed.
Q5: Are they hard to learn?
Not really. The first time might feel a little awkward and tricky, but after a couple of times you’ll get the hang of it.